广播发烧网

图解拆卸DE1103飞梭

author
·
2413
0


背景知识:我这是第二次拆飞梭了,第一次拆修时因为没有调整飞梭触片的角度,所以装上后,频率数字读数和虚拟指针总是往回跳,所以才有了第二次“手术”。

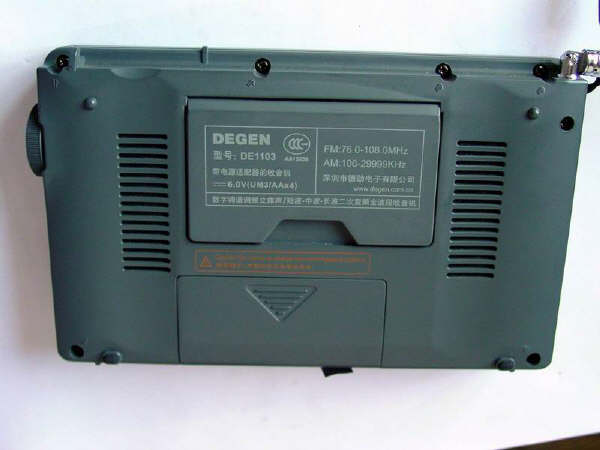
1.准备拆机。我的爱机趴在桌子上,等着我给他动手术了。拆机后盖。固定后盖一共有七个小十字螺丝,看清楚了,上面四个,下面两个,还有一个在电池和里面,少一个也不行。注意,是带有双箭头标志的螺丝孔,天线下面的那个螺丝孔不要拆,那个是固定天线的。

<IMG &#111nmousewheel="return bbimg(this)" style="WIDTH: 524px" src="/content/uploadfile/20047115157734.JPG?dc=4675478552449343651" onload="&#106avascript:if(this.width>screen.width-500)this.style.width=screen.width-500;" border=0>

<?xml:namespace prefix = v /></v:stroke></v:f></v:f></v:f></v:f></v:f></v:f></v:f></v:f></v:f></v:f></v:f></v:f></v:formulas></v:path></v:shapetype></v:imagedata><?xml:namespace prefix = w /></w:wrap></v:shape>2.把飞梭旋钮拔下来。用手捏紧稍微用力一拔,就下来了。

<IMG &#111nmousewheel="return bbimg(this)" style="WIDTH: 524px" src="/content/uploadfile/200471151520621.JPG?dc=4675478552455902226" onload="&#106avascript:if(this.width>screen.width-500)this.style.width=screen.width-500;" border=0>

3.打开机壳后盖,用尖嘴钳子拧下飞梭的固定螺丝。

<IMG &#111nmousewheel="return bbimg(this)" style="WIDTH: 524px" src="/content/uploadfile/200471151542371.JPG?dc=4675478552463685661" onload="&#106avascript:if(this.width>screen.width-500)this.style.width=screen.width-500;" border=0>

</v:stroke></v:f></v:f></v:f></v:f></v:f></v:f></v:f></v:f></v:f></v:f></v:f></v:f></v:formulas></v:path></v:shapetype></v:imagedata></w:wrap></v:shape>4.拔下连接飞梭的三线插头。

<IMG &#111nmousewheel="return bbimg(this)" style="WIDTH: 524px" src="/content/uploadfile/200471151551112.JPG?dc=4675478552471464324" onload="&#106avascript:if(this.width>screen.width-500)this.style.width=screen.width-500;" border=0>

</v:stroke></v:f></v:f></v:f></v:f></v:f></v:f></v:f></v:f></v:f></v:f></v:f></v:f></v:formulas></v:path></v:shapetype></v:imagedata></w:wrap></v:shape>5.起出飞梭。由于飞梭后面的那个黄色方形元器件有点挡住了飞梭的出路,所以要用小螺丝刀稍微橇一下,才能把飞梭取出。这一步一定要小心,不要弄坏机壳。

<IMG &#111nmousewheel="return bbimg(this)" style="WIDTH: 524px" src="/content/uploadfile/20047115160833.JPG?dc=4675478552477929045" onload="&#106avascript:if(this.width>screen.width-500)this.style.width=screen.width-500;" border=0>

6.飞梭拿下来了。用小螺丝刀橇直飞梭后盖片的八字固定脚,取下后盖片。(如果你是在换新飞梭,尧尧寄的新飞梭可能不会有那组带插头的三根连线,你需要用电烙铁把旧飞梭的三个线头烫下来,再焊到新飞梭上。)

<IMG &#111nmousewheel="return bbimg(this)" style="WIDTH: 524px" src="/content/uploadfile/200471151615140.JPG?dc=4675478552488914617" onload="&#106avascript:if(this.width>screen.width-500)this.style.width=screen.width-500;" border=0>

</v:stroke></v:f></v:f></v:f></v:f></v:f></v:f></v:f></v:f></v:f></v:f></v:f></v:f></v:formulas></v:path></v:shapetype></v:imagedata></w:wrap></v:shape></v:imagedata></w:wrap></v:shape>7. 这是连在飞梭旋钮上的转轮片。当你手拨飞梭旋钮时,就是这个转轮在转动,与那四个触片交织在一起,产生调谐作用。当然其中的原理我就说不清楚了。

<IMG &#111nmousewheel="return bbimg(this)" style="WIDTH: 524px" src="/content/uploadfile/200471151622876.JPG?dc=4675478552496247876" onload="&#106avascript:if(this.width>screen.width-500)this.style.width=screen.width-500;" border=0>

8.这是飞梭后盖上的四个触片,我们唯一所能做的,就是调整四个触片的平行间距和垂直角度,将其调整均匀。增大角度就会增加阻尼,角度太小,飞梭就会打滑或倒转。当然,“打扫卫生”是必不可少的。(我也不明白编码开关在哪里,为什么有的大侠说是编码开关出了问题。)

<IMG &#111nmousewheel="return bbimg(this)" style="WIDTH: 524px" src="/content/uploadfile/200471151629436.JPG?dc=4675478552501587952" onload="&#106avascript:if(this.width>screen.width-500)this.style.width=screen.width-500;" border=0>

9.调好之后,将飞梭复原,飞梭后盖片的八字固定脚,一定要紧紧地固定好,因为它直接影响触片与飞梭转轮的吻合程度。

10.上好飞梭,拧上固定螺丝,插上三线插头。安上机壳后盖,拧好螺丝, 试了一下,好了,指针不回跳了。OK!

实际上拆机和动手术是一个道理,人动手术次数多了不行,机器拆的次数多了也是会影响使用寿命的。

<IMG &#111nmousewheel="return bbimg(this)" style="WIDTH: 524px" src="/content/uploadfile/200471151641884.JPG?dc=4675478552444544423" onload="&#106avascript:if(this.width>screen.width-500)this.style.width=screen.width-500;" border=0>

文章目录

    评论 (0)